As Kubernetes(K8s) has become the most popular container orchestration tool, I decided toconsolidate my experiences while deploying a Spring Boot app on K8s.
The purpose of this article is to go over some of the concepts of K8s like Pods, Deployment,Secrets, Port forwarding and exposing Pods as a service.
We will split this whole journey into multiple parts and keep working incrementally towardsusing more features of K8s throughout this article.
Part 1 — Building a Spring Boot App as a Docker image
https://spring.io/guides/gs/spring-boot-kubernetes/ is a good blog that describes the steps of building images. Let's try to do this ourselves in this article.
First step is to install Docker for your OS. I use a Mac and used this link to install on mine.https://docs.docker.com/docker-for-mac/install/
Next, create a simple Spring Boot app by using https://start.spring.io/. You could also create it manually by creating your own project with the required Spring dependencies or by using SpringCLI. https://docs.spring.io/spring-boot/docs/current/reference/html/cli.html . The only important thing is to have a sample Spring Boot app that you can compile and package.
Ensure that you have the same java version or a higher one than what is auto-generated. If you don’t have the same java version as provided in the project, please update your IDE settings accordingly.
We will just add a simple Hello World REST API end-point to validate our application after the deployment.
You will need to edit your pom.xml file to add another dependency to use the libraries for building REST Controllers for API end-points.

Below is the controller class that will return a plain String “Hello World” when it receives a GET request on the path “/helloworld”

Next step is to build this project to produce a fat jar in the target directory that contains all the required jars.

By this time you must have your fat jar in the target directory.
Now we can build a docker image by creating a Dockerfile.
The contents of the Dockerfile are pretty simple, all they do is package the open jdk version compatible with your code and add the fat jar that you built just now.

Build the docker image using the command below.

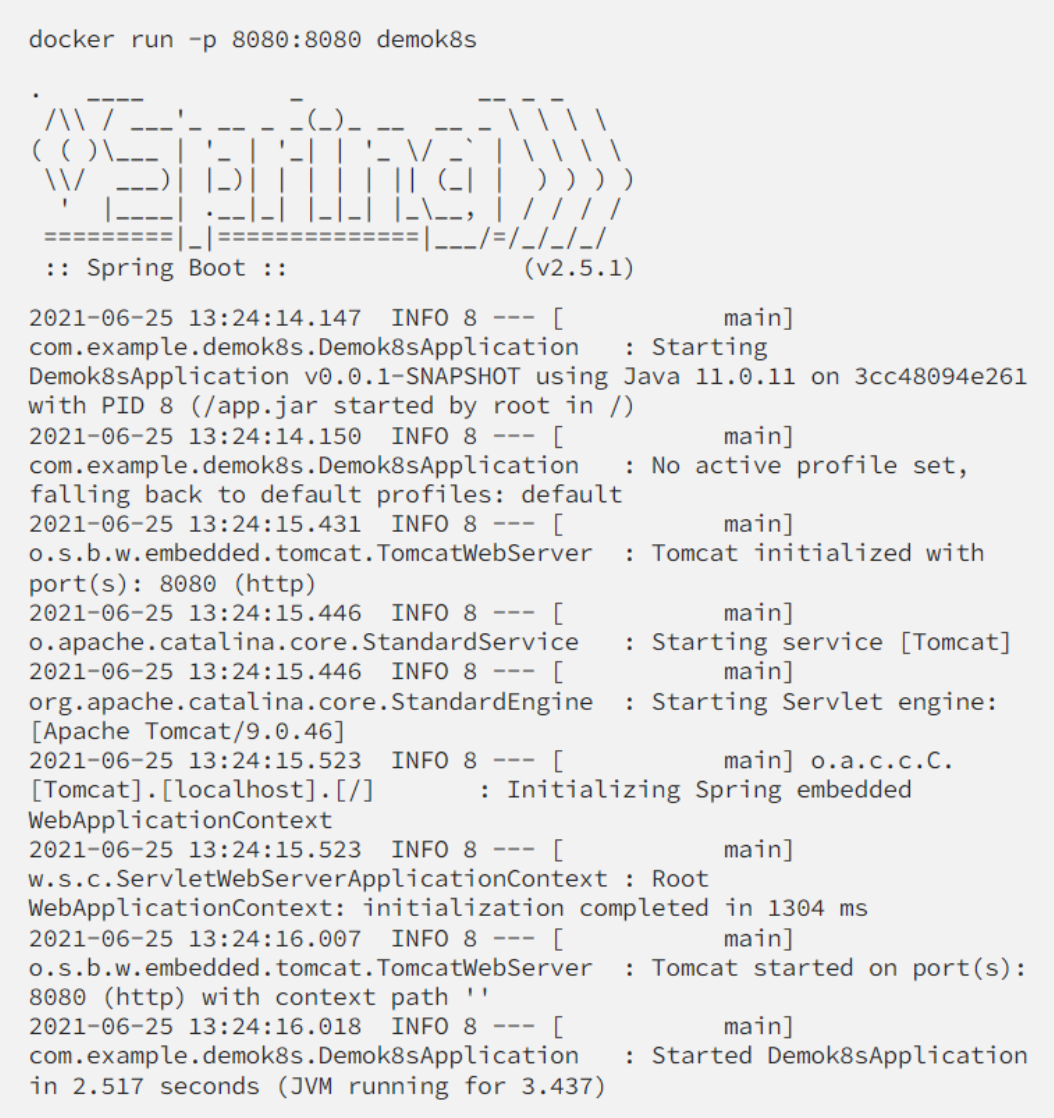
At this moment, you should be able to run a container using this image in your docker. Our eventual goal is to run it in K8s but let’s verify what we have built so far in Docker container.

You can verify that the REST API end-point you built is working now.

But our goal is to run it in K8s ! So, let’s keep going.
Part 2— Deploying Spring Boot App in K8s
The first thing we need to do is install minikube which provides us with a single node cluster to deploy and validate the Pods(analogous to containers in Docker but a Pod could potentially have multiple containers even though that is uncommon. Pod is the smallest logical unit that can be run in a K8s cluster)
Once you have installed minikube and started the local cluster, you are ready to deploy your firstPod. But a few more steps before we get there.
By default, your K8s cluster will try to pull the images from Docker hub. Technically, it is still possible to test your local minikube cluster with your own local Docker registry. However, for the purpose of completeness and as a standard practice, we will use Docker hub for our images.
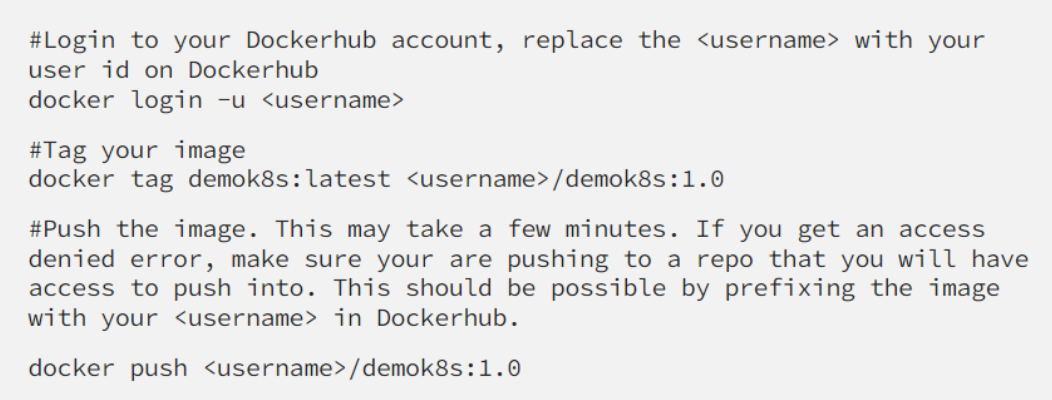
Now, we need to push the image we have built to Docker hub. You should create an account on Docker hub(https://hub.docker.com/ ) if you don’t have one already. There are multiple pricing options and the free one allows you to create unlimited public repositories. We will first start by building a public repo and later on use our private repository and understand how we can connect to that using K8s.

At this moment, your repo must be available publicly on Docker hub. You can verify that at this link https://hub.docker.com/repositories which will show the list of repositories you created.
Since this a public repo, there are no special configurations required for your minikube cluster to pull this image. For a private repo, you will need some additional configurations using`imagePullSecrets` tag in your deployment yml. But we will go over it in more detail later on.
We are now ready to deploy this image as a Pod in our minikube cluster.
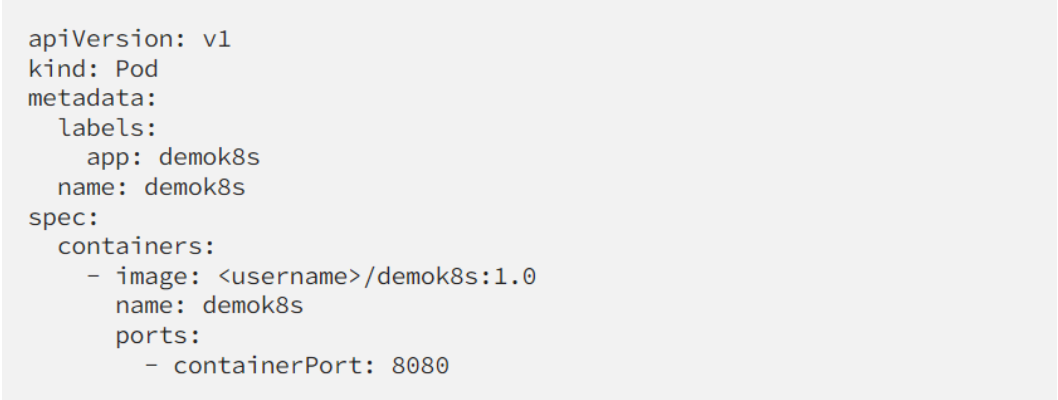
Create a demok8s.yml file containing the description of your Pod. It is a very simple yml thatprovides the name of your Pod, a label(in K8s, labels are used to select resources like Secrets,Deployments, ConfigMap, Pods etc when linking them together, you can consider this as aninformational field for now).

Deploy this by running the command below:

Let’s try to access our REST API end-point against this Pod. To do that, we need to perform port forwarding so that we can access this Pod within the cluster. There are other options like creatingService to expose this functionality but let’s use this option for now.

At this moment your requests against your localhost:9080 are being forwarded to 8080 of yourPod. I intentionally changed the port to identify which is our host port(9080) and which is our target Pod port(8080).
At this moment, you should be able to curl against your localhost and verify the REST API.


%201.svg)